Issue with AIR after installing Flex 3.0.2 Updater

After just installing the Flex 3.0.2 Updater the AIR project that I was working on didn’t quite agree with my proactive decision.

Upon debug it was throwing the error.

Process terminated without establishing connection to debugger.

Command:

“/Applications/Adobe Flex Builder 3/sdks/3.2.0/bin/adl” -runtime “/Applications/Adobe Flex Builder 3/sdks/3.2.0/runtimes/air/mac” /workspace/theAirApp/bin-debug/theAirApp-app.xml /workspace/theAirApp/bin-debug

Output from command:

error while loading initial content

This issue has been logged with Adobe with the work around being to modfiy the namespace in your AIR applications-xml file to use 1.5 like so


Be generous… share your assets

Within your team at least..

I know for some people sharing doesn’t come easy, for some it’s in their nature while others battle to give anything away. These people are also generally high in the tight arse scale.

However when it comes to developing projects in teams it’s essential to provide ways of sharing our knowledge and code base.

Flex makes it fairly easy for us to share our components and assets across projects, allowing us to reuse the existing code base and yet maintain a single source.

There are a few ways of sharing your code base however I’ve found the easiest way for my is to create a Flex Library and share the compiled .swc across multiple projects using a custom namespace.

Of course you have the standard issues of sharing libraries such as versioning and assessing the impact that certain fixes may have in the applications that use it, but this is less of an issue if the components are developed correctly and that the components that reside in your library warrant being there.

Steps to start sharing and to stop being so selfish.

1. Create a new Flex Library Project

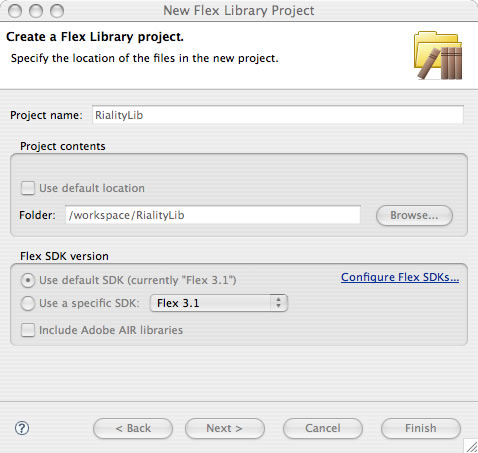
Move your custom components into the source of the library project. If you’re moving components from an existing flex application you’ll need to ensure that your package structures are correct.

2. Create your manifest.xml

From the adobe website "Manifest files map a component namespace to class names. They define the package names that the components used before being compiled into a SWC file. They are not required when compiling SWC files, but they can help keep your source files organized."

It identifies which files are contained in the specified namespace which we will setup next

The best way to create one is to base it on the existing manifest.xml from the Flex 3 SKD. Modify your new manifest.xml to include all of your new components.

eg.


Save this file in your /src/ folder. I like to prefix the file with the name of the project eg rialitylib-manifest.xml

3. Create your config.xml

We now need to create our config file for the library project. This lets the compiler know which manifest file the namespace relates to. Again you can base this config on the existing flex-config.xml, however since we’re really only care for the namespace so it’s best strip everything else out to look something like this.


http://www.rialitycheck.com/2008/mxml
rialitylib-manifest.xml


Save this file in your /src/ folder. Again I like to prefix the file with the name of the project eg rialitylib-config.xml

4. Load your config

Now that we’ve got everything we need to compile the new component library our final step is to tell the compiler to load up the newly created config file.

To do so we just add the following into the Additional compiler arguments on the Flex Library Compiler Panel
-load-config+=rialitylib-config.xml

That’s it for you project, everything should compile and a .swc should end up in your output folder.

5. Open your flex existing project and Import your swc
So your team mates have decided to share their code! After giving them high fives open your existing/new flex project. You can either drop the compiled swc into your project or create a swc folder and point to the bin directory of your library project you just created. The latter method allows you to recompile your library and not have to worry about dropping the swc back into your project.
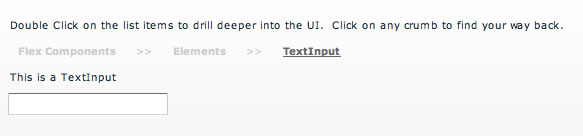
6. Use them
To use your teams custom components simply define your namespace in the top of your .mxml file and then reference your components accordingly. Otherwise flex will create one for you when using autocomplete.
eg.


That’s all there is to it.

As long as you keep track of your library component versions and have a suitable tracking procedure you’ll enjoy having a single code base for all your reusable code. The place where you really save lots of time is in maintenance across your applications. You can also break up the development team by allocating library tasks and application specific tasks separately.

Plus your good karma rating goes up when you share.

On a side note, after watching Charlie Boorman’s and Ewan McGregor’s Series the Long way down giving a little to Unicef definitely goes a long way. If you’re feeling extra generous you can make a donation here

What’s behind the preloader?

What’s behind the pre-loader?

CursorManager.setBusyCursor();

When designing a new UI it’s important to delve inside the end user’s cerebral hemispheres to understand what drives users to perform the tasks they do.

The pre-loader as a concept has been around for a long time in various forms not necessarily related to web applications. It can be seen in the form of a support act when going to see a band, or the lighting before a thunder storm, or the clowns before the lion tamer. In one way or another the pre-loader has provided a way to distract the user from the time taken to get to their main goal at that given point in time.

Adobe has obviously has understood the necessity for the pre-loader concept and have included pre-loading functionality inside the flash component library, and more recently Flex. Flex also has the capability of setting the busy cursor on service request thus emphasising the importance of notifying the user and keeping them aware that that data will appear to a screen near them. Of course this type of distraction is minimal, however providing something that is too distracting may result in a slight loss in the ability for the user to focus back on the task of interest.

I remember reading about a case study about a property owner of a large corporate building. Not a day would go past without a complaint about the building’s lift and how long it took to arrive in the lobby. It came to the stage where something needed to be done about this. For the owner there were two obvious solutions, one would be to spend thousands on getting the lift replaced or let the issue go and continue being at the end of the complaint stream. An associate suggested that the owner get a psychologist in, they agreed to bring him in after much speculation. His suggestion was not to worry about replacing the lift but to fit full length mirrors in the lobby. The mirrors were installed and as a result not a single complaint was received from that point on.

In this case the mirrors were the pre-loader and the data was the lift. People were distracted by the fact that they could look at themselves while waiting for the lift (there was probably some sort of Flexing involved too). It was a very simple yet elegant solution.

Inside the flex applications that I build I like to pre-load all requests to the server whether it be as a busy cursor / text notification / progress bar or even sound (elevator music anyone?). The simplest way way I’ve found to do this is to have a public String property on my Model of course you may want to create a more detailed class but I’ll use the string in this example. By setting this property from my commands it allows the application to listen/test to the changes to this and display the required feedback/preloader to the user.

an example would be something like this

ModelLocator.as
public var statusMessage:String = "";

GetLiftCommand.as

MainBuilding.mxml

In todays development world where the amount of information that is being pushed back to the client is getting larger and larger, pre-loading is important to not only give feedback to the user but to give them a slight distraction prior to the data arriving.

CursorManager.removeBusyCursor();

Flex SDK 3.1 and Flex Builder 3.0.1 Released

Matt Chotin has posted an article about the release of the latest version of the Flex Builder version 3.0.1. This Flex Builder update includes the Flex 3.1 SDK along with a number of bug fixes and certified versions of the professional data visualization and testing components.

To manually initiate an update to Flex Builder using the Adobe Updater, open Flex Builder and go to Help > Search for Flex Builder Updates…

Crumbline Navigation

Crumbline navigation has been around for a long time. The first instance I can recall was when Hansel and Gretel used a Crumbline of pebbles to navigate their way out of the forest. It was only when they used bread crumbs instead of pebbles did they become lost.

Crumblines are a great way for uses to navigate through the UI especially if the UI contains wizards and or drill downs. It provides instant feedback to the user in relation to the depth and direction of their navigational choices.

Uses can then step back to the exact position they want by selecting the specific crumb at any given time.

This is an example I created in Flex 3 to illustrate the Crumbline Navigation in it’s most simplistic form.

This component takes in a collection of Crumb Objects.
The Crumbline then dispatches “crumbEvents” when a crumb item is selected, letting the view dictate how it handles the navigational change.

eg.


In this example I used a simple viewstack and bound this to the Crumbline using it’s selectedIndex property.


A demo of this can be seen here

Special thanks to the Brothers Grimm for the Crumbline model.

Mac and PC working together with Synergy

I’m running both a Mac and PC in my current development environment. I’ve got some software on both platforms that I use that gotten around to port accross to either the mac or pc. Another benefit is browser testing for any type of css/HTML work.

This nifty piece of software called Synergy allows you to share your mouse across multiple machines. It also allows copy and paste although with a PC/MAC combination bitmap data is not yet supported so only text can be stored on the clipboard at the moment.

You can download the software here and you’ll need to allocate a server and the clients that connect to it.

For those fence sitters out there that can’t decide which platform to use this may be a solution 🙂

Removing the theme color from the Flex TileList

There have been a number of occasions when the designs for a UI implements some kind of grid layout to display its items. This is fairly simple to implement in flex by utilising the Flex TileList component. However more often than not the List’s item renderers are required to look after their own states. In this case the TileLists Indicators are no longer required.

I have found the easiest way to remove the TileLists indicators is to set the ThemeColor to the background color of whatever the List is being displayed on. But what happens if the background contains an image or has a transparency value?

To do this you need to override the TileLists drawSelectionIndicator and drawHighlightIndicator methods.


override protected function drawSelectionIndicator(
indicator:Sprite, x:Number, y:Number,
width:Number, height:Number, color:uint,
itemRenderer:IListItemRenderer):void
{
/* we don't need to do anything in here*/
}
override protected function drawHighlightIndicator(
indicator:Sprite, x:Number, y:Number,
width:Number, height:Number, color:uint,
itemRenderer:IListItemRenderer):void
{
/* we don't need to do anything in here*/
}

Notice that the body to the above methods are empty. This is because we don’t want the indicators to draw anything behind the renderers when the state changes.

Now just don’t forget to cater for this inside your TileList’s item renderer else the user will get confused as to which item is selected and which item their mouse is over. We wouldn’t want that would we 🙂

Transfer ORM and Flex

Recently I’ve been working on a project to deliver something that was more proof of concept which in a business sense building something in a relatively short time frame.

I decided to develop the front end with Flex 3 and the back end with ColdFusion 8 using the flex remoting classes to connect the two together. Having chatted recently to a couple of fellow developers there was a consensus among them that documentation for connecting both ColdFusion and Flex was underdone and that it could possibly be the Achilles heel in using CF as the server side technology.

I myself haven’t found any issues in connecting the two together. Sure there are a couple of files that need to be configured everything hangs together harmoniously. Compared to other technologies like webOrb and amfPHP it’s relatively painless.

Transfer
Due to the nature of the beast I needed something that would look after my CRUD methods on the server side. I didn’t want to have to spend time hand writing this code and having seen a couple of presentations on Transfer it made sense to use this as my ORM. For those of you that don’t know about Transfer it’s an ORM for Coldfusion. It allows you to create your object relational mappings of your database allowing you to perform simple to complex database transactions. More information on Transfer can be found here. I then used Transfer to plug into a lightweight CF framework that I had custom built some time ago that I normally use for Flash and Flex development using the facade pattern to expose the required services.

Other Code Generating Tools
I also use the Illudium PU-36 Code generator developed by Brian Rinaldi to help create the ORM mappings and services and gateways for the required objects. You can download and read more about this code generator here on the RIAforge website.

These two great tools allow me to create the server model fairly quickly allowing to spend more time planning and creating the UI.

Setting up Transfer to work with Flex
You first need to setup your objects on the client and server. If you are using Cairngorm on the client these would be your Value Objects. On the server these would be your Objects that your Transfer objects would be extending.

I’ll be using the blog application that ships with Transfer as the examples. Hopefully I’ll be able to post the running application once I’ve completed it.

In your flex value object.

package com.riality.tblog.vo
{
import com.adobe.cairngorm.vo.IValueObject;

[RemoteClass(alias="tblog.com.PostVO")]

[Bindable]
public class PostVO implements IValueObject
{

public var IDPost:String = "";
public var Title:String = "";
public var Body:String = "";

public function PostVO()
{
}

}
}

The important part here is your RemoteClass metatag. This must correlate to the Value object in your CF framework. This is done by extending your transfer object inside your Transfer.xml to an Object that can bind to your flex value object.

Example inside your Transfer.xml


... etc

Note inside your Transfer Post Object extends your custom defined Post object. This in turn extends the “transfer.com.TransferDecorator” which allows you object to bind to Flex with all the necessary getters and setters for the declared properties.

Example of the custom defined Post Object


If you weren’t using Flex as your view you wouldn’t need to declare your properties here as Transfer creates the required getters and setters. However Flex needs these properties declared to map your bindable Flex class.

Now to connect the two together you just need to setup your facade to allow flex to get to your necessary services.

Example in your facade.cfc


The above gets the instance of you Post service and calls the method getpost which is basically a wrapper for your transfer call.

Example inside your postservice.cfc


Once you’ve set that all up all you need to do now is dispatch your Cairngorm event to allow your delegate to connect to your facade. Which I won’t go into detail inside this post, as it’s the bread and butter in working with Cairngorm.

This is a quick overview of setting up the required infrastructure to get Transfer working with Flex. Hopefully it gives some insight into connecting Flex, Coldfusion and Transfer together.

Downloads

Gumbo anyone?

The flex doc team has posted some links in relation to the next release of Flex. Flex 4 – Code name GUMBO. This next release focuses on 3 primary themes

  • Further helping the collaboration between developer and designer
  • Improving developer productivity
  • Further enhancing the Flex framework to leverage off the Flash Players new capabilities

More information can be found here