Previously in Flex 3 List Components came with a style property called the itemsChangeEffect. This allowed you to specify a sequence of effects to apply to the item renderers when a change to the dataProvider occurred.
eg.
|
1 2 3 4 5 6 7 8 9 10 11 12 13 14 15 16 17 18 19 20 21 22 23 24 25 26 27 28 29 30 31 32 33 34 35 36 37 38 39 |
<mx:Sequence id="dataChangeEffect1"> <mx:Blur blurYTo="12" blurXTo="12" duration="300" perElementOffset="150" filter="removeItem"/> <mx:SetPropertyAction name="visible" value="false" filter="removeItem"/> <mx:UnconstrainItemAction/> <mx:Parallel> <mx:Move duration="750" easingFunction="{Elastic.easeOut}" perElementOffset="20"/> <mx:RemoveItemAction startDelay="400" filter="removeItem"/> <mx:AddItemAction startDelay="400" filter="addItem"/> <mx:Blur startDelay="410" blurXFrom="18" blurYFrom="18" blurXTo="0" blurYTo="0" duration="300" filter="addItem"/> </mx:Parallel> </mx:Sequence> <!-- This TileList uses a custom data change effect. --> <mx:TileList id="tlist0" height="400" width="400" fontSize="30" fontStyle="bold" columnCount="4" rowCount="4" direction="horizontal" dataProvider="{myDP}" allowMultipleSelection="true" offscreenExtraRowsOrColumns="4" itemsChangeEffect="{dataChangeEffect1}"/> |
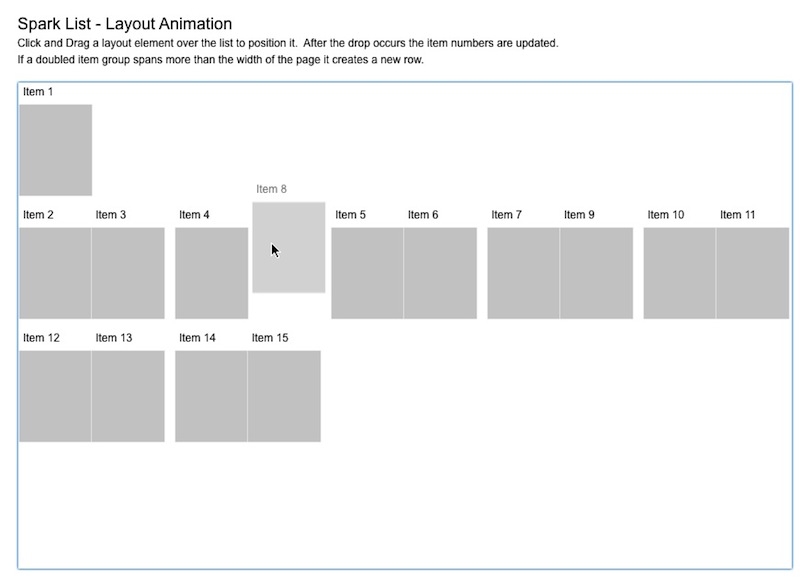
Because I was writing a Flex 4 Application I couldn’t find anything similar to this property in the Spark List components, so I decided to roll my own utilising a Custom layout for the List Component.
With the Flex 3 itemsChangeEffect you had to wait for your data to change before the effect would take place. With my effect I wanted the user to be able to drag an item around the list with the other elements moving away to allow for placement of the dragged item. Kind of like moses parting the waves with a draggable item.
Writing the custom layout:
Positioning the Elements.
Inside the custom layout it’s the override of the updateDisplayList that does the hard yakka positioning and sizing the List items. It makes sure that the items x and y positions do not overlap or exceed the width of the component. In this instance the first item is in the first row and any subsequent elements are beneath this in pairs.
Drag and Drop
For this layout I still needed the the drag and drop functionality so I extended the TileLayout.
If you still need the drag and drop functionality you may need to override a handful of the methods needed to calculate the dropLocations,indices and the location of the dropIndicator.
calculateDropLocation
calculateDropIndex
calculateDropCellIndex
calculateDropIndicatorBounds
Animating the elements – things to remember
With animating a Flex container you need to set the autoLayout flag to false before the animation to prevent flex from updating the containers layout after a child element is resized or repositioned. Once the animation has finished the autoLayout flag can be set back to it’s default value of true.
|
1 2 3 4 5 6 7 8 9 10 11 12 13 14 15 16 17 18 19 20 21 22 23 24 |
override public function updateDisplayList(width:Number, height:Number):void{ ... if(animate){ target.autoLayout = false; target.validateNow(); var trans:Parallel = new Parallel(target); trans.addEventListener(EffectEvent.EFFECT_END,onTransitionEnd); trans.play(); } } private function onTransitionEnd(e:EffectEvent):void{ e.target.removeEventListener(EffectEvent.EFFECT_END,onTransitionEnd); target.autoLayout = true; } |
Only animate the elements that need animating. This is fairly obvious but can become a real bottleneck especially when dealing with large datasets. Test an elements previous position to determine whether it needs to be included in the sequence.
Depending on your interactivity you may need to set useVirtualLayout to false. Because virtualisation uses an estimate of elements displayed on screen for positioning and sizing, I found that with scrolling and dragging elements beyond the containers current scroll index, these elements were not being resolved. By setting it to false all elements are created and positioned allowing any calculations needed by those not currently displayed on the UI to still be allowed.
You can view and example of the layout here.
You can read more about the Spark SkinnableDataContainers here
Here is a nice article on creating custom layouts with Spark here
Hey, nice article about spark layouts!
Any chances to see the source files?
You can use any javascript librray you want, but the animations themselves must be written in CSS, not javascript. It is absolutely vital for mobile developers to learn CSS animation instead of javascript. The reason is that Javascript is actually very inefficient for animation, and it’s only recently, with the proliferation of mobile browsers, that we are starting to notice this. You see, with a JS animation (e.g. created using jQuery’s animate function), the javascript librray sets an interval timer (lets say, 33ms, which is about 30 frames per second), and on that interval, it figures out where the animated element should be, using complex math calculated by the CPU, and then puts it there. Unfortunately, if the CPU is too slow to do that calculation every interval, it gets backed up and the animation stutters. jQuery and other JS animation tools do some work to combat this, sensing a drop in frame rate and trying to make the interval wider, to give it more time to complete the calculations, but it’s often too-little-too-late.On the other hand, when you do a CSS animation (e.g. using the transform or webkit-transform css properties), you leave it to the GPU to simply calculate where the element should be as often as it can. As soon as it calculates the element’s new position and places it there, the GPU starts the calculation again. This means the animation is always as smooth as the GPU can possibly make it, no matter what. If you animate too many elements for the GPU to handle it may still have trouble, but instead of ugly stuttering, it will be a more graceful drop in framerate.Hope that helps.
Hello,
Can you please share the source for this example (?)
Thank you.
Regards,
Santanu
Unfortunately, this makes transitions nobtiacly choppier for my page (on an iPad 3), not smoother.> An abundance of animations would not affect the users battery. You’re either using the gpu or you’re not. If you have one dom element with z-rendering enabled, then you’re using the users battery.This is wrong. For one thing, the GPU is *always* being used by iOS, since it’s used for compositing. For another, of course you’re using more battery with lots of transitions, as you’re causing far more composition operations to occur. You’re using battery any time something is changing. There are more distinct visible frames, each of which has to be rendered (whether it happens on the CPU or GPU in reality it’s both). It’s not like the GPU is something that gets turned on and left on while you’re using it (like the gyroscope or wifi); it wakes up for the work it needs to do and then idles again.However, the difference is probably not significant and certainly not worth worrying about.
Hi, great post.
I’m trying to do the same as you but I found a lot of difficulties adding effects on updateDisplayList method. Some time the effect never stops and other times never starts.
So I’d like to know more details about you implementation.
Thanks,
Ruben
Angelo October 31, 2012 I’m following your steps but have run into a probelm at the transcode particular part. When I bring in the particles, there is nothing there. I have played around with the settings with no luck. I’m new to AE6 but know CS6 pretty good. Can you please help me. I have team viewer 7 if you want to do a remote. Please help
Thanks very much for the post. I have had a similar requirement and am trying to implement exactly the same as you have done here. Although not entirely successful with it yet, I sure hope to get it done. Was hoping whether you could expose the source code as that would be really helpful to understand how the event handling was done. Anyway, thank you very much for the provided information. Cheers!!
Chris Wave October 4, 2012 Hey Man,This tutorial is very cool and hefulpl but how can I delete the CC Sphere’s lines? (The green lines)Here is an image:
I was wondering on how i could cratee custom-properties vor a custom-view, which i can then later animate with the ViewPortertyAnimator.Something like “CustomView.MY_CUSTOM_PROPTERY”I hope you can help me!Thanks in advance ;)And by the way: I really like your shows on DevBytes 😉