Expandable Text Area

I had an issue recently where there was a standard form item, with a textInput as the entry component. The problem was that a single line was not large enough for the client to enter in the details that they required. Using a text area would be my next logical choice however because of certain real estate restrictions I wanted to keep as many form elements visible on the screen at the one time.

Hence the Expandable Text area, a hybrid of the single lined TextInput and the TextArea. Where typing and removing text would re-size the input component accordingly, and setting a text value would expand the component to cater to the text size.

It’s a fairly simple component with the overridden measure method doing most of the work.

measure

Below in the measure command we utilize both the viewMetrics to determine the number or lines and then the measuredHeight of the TextArea

onTextChange

There is also a listener and handler for the “textChanged” event that is dispatched from the extended TextArea. This handler invalidates the size of the component if the number of lines in the textField has been modified. I also had to sets the variable called useLineCount to determine whether the textFields.numLines attribute should be used. As when the component is first initialized with text, the textFields layout is not yet completely set thus returning an incorrect numLines value.

updateDisplayList

And the last piece is the updateDisplayList which sets the actual size of the textField based on the number of lines and the components unscaledWidth. It also sets the explicitWidth of the component if it results in a NaN. This occurs if the component’s width is determined by a percentage or layout constraints.

There it is, unfortunately it’s written with the Flex 3 SDK although I’ll eventually port it to 4. It’s a hybrid between the two text inputs which will enable the user to concentrate on data entry without having to worry about scroll bars and what they’d typed 50 characters ago.
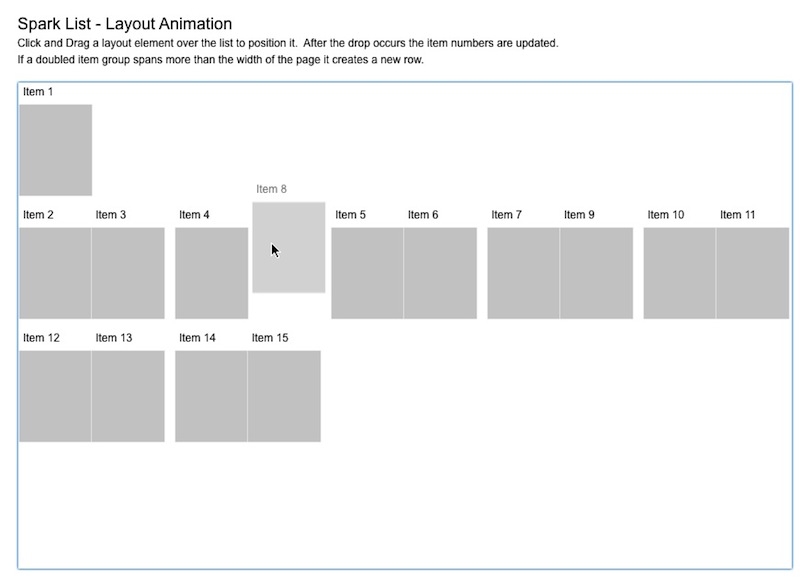
Animating Spark List Items.

Previously in Flex 3 List Components came with a style property called the itemsChangeEffect. This allowed you to specify a sequence of effects to apply to the item renderers when a change to the dataProvider occurred.

eg.

Because I was writing a Flex 4 Application I couldn’t find anything similar to this property in the Spark List components, so I decided to roll my own utilising a Custom layout for the List Component.

With the Flex 3 itemsChangeEffect you had to wait for your data to change before the effect would take place. With my effect I wanted the user to be able to drag an item around the list with the other elements moving away to allow for placement of the dragged item. Kind of like moses parting the waves with a draggable item.

Writing the custom layout:

Positioning the Elements.

Inside the custom layout it’s the override of the updateDisplayList that does the hard yakka positioning and sizing the List items. It makes sure that the items x and y positions do not overlap or exceed the width of the component. In this instance the first item is in the first row and any subsequent elements are beneath this in pairs.

Drag and Drop

For this layout I still needed the the drag and drop functionality so I extended the TileLayout.
If you still need the drag and drop functionality you may need to override a handful of the methods needed to calculate the dropLocations,indices and the location of the dropIndicator.

calculateDropLocation
calculateDropIndex
calculateDropCellIndex
calculateDropIndicatorBounds

Animating the elements – things to remember

With animating a Flex container you need to set the autoLayout flag to false before the animation to prevent flex from updating the containers layout after a child element is resized or repositioned. Once the animation has finished the autoLayout flag can be set back to it’s default value of true.

Only animate the elements that need animating. This is fairly obvious but can become a real bottleneck especially when dealing with large datasets. Test an elements previous position to determine whether it needs to be included in the sequence.

Depending on your interactivity you may need to set useVirtualLayout to false. Because virtualisation uses an estimate of elements displayed on screen for positioning and sizing, I found that with scrolling and dragging elements beyond the containers current scroll index, these elements were not being resolved. By setting it to false all elements are created and positioned allowing any calculations needed by those not currently displayed on the UI to still be allowed.

You can view and example of the layout here.

You can read more about the Spark SkinnableDataContainers here

Here is a nice article on creating custom layouts with Spark here

Mashing up Flex in Australia

I recently found out about a competition being held in Australia, by the
Government 2.0 Taskforce called Mashup Australia. This taskforce, as taken from their Terms of reference.

will advise and assist the Government to:

  • make government information more accessible and usable — to establish a pro-disclosure culture around non-sensitive public sector information;
  • make government more consultative, participatory and transparent — to maximise the extent to which government utilises the views, knowledge and resources of the general community;
  • build a culture of online innovation within Government — to ensure that government is receptive to the possibilities created by new collaborative technologies and uses them to advance its ambition to continually improve the way it operates;
  • promote collaboration across agencies with respect to online and information initiatives — to ensure that efficiencies, innovations, knowledge and enthusiasm are shared on a platform of open standards;
  • identify and/or trial initiatives that may achieve or demonstrate how to accomplish the above objectives.

The Mashup Australia competition was created to emphasis this and provide a practical demonstration of the benefits of opening up sets of their data.

There was quite a large amount of data sets available albeit some not exactly in the most usable format. It was a great way to make the public aware that this data exists, and for us as developers to have fun with how this data could be presented.

I spent a few days on a couple of entries, using flex and flash for the UI. It would have been nice to have a bit more time to test them and to add a few more bells and whistles.

1.

The first idea I had was called the GCI PhotoHUB. Because a number of Government Cultural Institutions publish their photographs onto flickr I thought it would be nice to have a central application to be able to search/view these common image sets.

I used the neat as2flickrlib API however I did realise that the commons API was not included in the lib so I had to write one myself for getting that particular piece of information.

I wanted to create something that was intuitive for the end user and something a little playful for them to interact with.

This is the entry here

2.
The second idea was to create more visually digestible way to display crime statistics in Australia. I chose a number of methods for this which included primarily a map overlay, secondary – charting components, thirdly – a raw data set. I felt that this would give the end user 3 options depending on what they felt comfortable with.

The initial UI was changed slightly after working through some UX concepts from a good friend of mine who works as a UX consultant.

There were a number of design cues including the map indicators taking reference from police lights as well as the font chosen for the map overlay to help with the overall theme.

The data set provided was in the form of an xls document. Because .xls documents aren’t exactly the best format for web applications. I created a webservice to read the xls file and serve up the data as both a ColdFusion query set as well as a call to return XML. Making the data much more useful for both Flex and potentially other developers eventually.

This is the entry for crimewave here

Both these apps were built in quick time so I’m sure there will be a couple of bugs crawling around 🙂 so if you find one feel free to let me know. Overall it was a fun way to utilise this newly exposed data from the Government and even a better way to expose it using Flex as the tool.

I think I might try a Swiz

After talking to a friend about frameworks and so forth. He mentioned
the Swiz framework after incorporating it in a project he was currently working on. Being a dedicated Cairngorm guy I couldn’t say
that I had looked at Swiz before but from what I had heard it sounded like something that may be useful in the future. I had also thought it would make a great name for a cocktail “Excuse me bartender fetch me another Swiz”…

Removing the theme color from the Flex TileList

There have been a number of occasions when the designs for a UI implements some kind of grid layout to display its items. This is fairly simple to implement in flex by utilising the Flex TileList component. However more often than not the List’s item renderers are required to look after their own states. In this case the TileLists Indicators are no longer required.

I have found the easiest way to remove the TileLists indicators is to set the ThemeColor to the background color of whatever the List is being displayed on. But what happens if the background contains an image or has a transparency value?

To do this you need to override the TileLists drawSelectionIndicator and drawHighlightIndicator methods.


override protected function drawSelectionIndicator(
indicator:Sprite, x:Number, y:Number,
width:Number, height:Number, color:uint,
itemRenderer:IListItemRenderer):void
{
/* we don't need to do anything in here*/
}
override protected function drawHighlightIndicator(
indicator:Sprite, x:Number, y:Number,
width:Number, height:Number, color:uint,
itemRenderer:IListItemRenderer):void
{
/* we don't need to do anything in here*/
}

Notice that the body to the above methods are empty. This is because we don’t want the indicators to draw anything behind the renderers when the state changes.

Now just don’t forget to cater for this inside your TileList’s item renderer else the user will get confused as to which item is selected and which item their mouse is over. We wouldn’t want that would we 🙂

Transfer ORM and Flex

Recently I’ve been working on a project to deliver something that was more proof of concept which in a business sense building something in a relatively short time frame.

I decided to develop the front end with Flex 3 and the back end with ColdFusion 8 using the flex remoting classes to connect the two together. Having chatted recently to a couple of fellow developers there was a consensus among them that documentation for connecting both ColdFusion and Flex was underdone and that it could possibly be the Achilles heel in using CF as the server side technology.

I myself haven’t found any issues in connecting the two together. Sure there are a couple of files that need to be configured everything hangs together harmoniously. Compared to other technologies like webOrb and amfPHP it’s relatively painless.

Transfer
Due to the nature of the beast I needed something that would look after my CRUD methods on the server side. I didn’t want to have to spend time hand writing this code and having seen a couple of presentations on Transfer it made sense to use this as my ORM. For those of you that don’t know about Transfer it’s an ORM for Coldfusion. It allows you to create your object relational mappings of your database allowing you to perform simple to complex database transactions. More information on Transfer can be found here. I then used Transfer to plug into a lightweight CF framework that I had custom built some time ago that I normally use for Flash and Flex development using the facade pattern to expose the required services.

Other Code Generating Tools
I also use the Illudium PU-36 Code generator developed by Brian Rinaldi to help create the ORM mappings and services and gateways for the required objects. You can download and read more about this code generator here on the RIAforge website.

These two great tools allow me to create the server model fairly quickly allowing to spend more time planning and creating the UI.

Setting up Transfer to work with Flex
You first need to setup your objects on the client and server. If you are using Cairngorm on the client these would be your Value Objects. On the server these would be your Objects that your Transfer objects would be extending.

I’ll be using the blog application that ships with Transfer as the examples. Hopefully I’ll be able to post the running application once I’ve completed it.

In your flex value object.

package com.riality.tblog.vo
{
import com.adobe.cairngorm.vo.IValueObject;

[RemoteClass(alias="tblog.com.PostVO")]

[Bindable]
public class PostVO implements IValueObject
{

public var IDPost:String = "";
public var Title:String = "";
public var Body:String = "";

public function PostVO()
{
}

}
}

The important part here is your RemoteClass metatag. This must correlate to the Value object in your CF framework. This is done by extending your transfer object inside your Transfer.xml to an Object that can bind to your flex value object.

Example inside your Transfer.xml


... etc

Note inside your Transfer Post Object extends your custom defined Post object. This in turn extends the “transfer.com.TransferDecorator” which allows you object to bind to Flex with all the necessary getters and setters for the declared properties.

Example of the custom defined Post Object


If you weren’t using Flex as your view you wouldn’t need to declare your properties here as Transfer creates the required getters and setters. However Flex needs these properties declared to map your bindable Flex class.

Now to connect the two together you just need to setup your facade to allow flex to get to your necessary services.

Example in your facade.cfc


The above gets the instance of you Post service and calls the method getpost which is basically a wrapper for your transfer call.

Example inside your postservice.cfc


Once you’ve set that all up all you need to do now is dispatch your Cairngorm event to allow your delegate to connect to your facade. Which I won’t go into detail inside this post, as it’s the bread and butter in working with Cairngorm.

This is a quick overview of setting up the required infrastructure to get Transfer working with Flex. Hopefully it gives some insight into connecting Flex, Coldfusion and Transfer together.

Downloads

Possible new musical project of mine

I’ve got a couple of projects on the back burner while a finish off the existing ones. But my latest idea has stemmed from the musical side. I’ve always been a fan of music and playing a bit of guitar has been a passion of mine. I’ve tried my hand at writing music but have always done this in a more conventional manner. Paper, Pen, piece of scrap paper lying around the house.

However this time around I’m going to write a song, but this time in pure Actionscript. It will be a classy song of course however listeners won’t be able to hear it until they’ve registered and the song is completely compiled.

Seriously though it would be an interesting project to start, having some sort of sound library with different progressions and scales and keys. Each of these being executed along from the time line similar to sheet music or guitar tablature. Would also need a audio dictionary for the lyrics. Might end up sounding a bit like Fitter Happier by Radiohead.

Anyway this idea needs more storming.

Manage my bundle

Traditionally used for managing locale settings especially languages the ResourceManager in Flex 3 can also be used for loading in other environment variables.

On my development machine I’m loading in service URL’S, dummy sessions and a few other things. One other option would be to hard code test data into a static class but because these values are used for more than one application it allows me to change this values in a single location.

You first need to declare your source path to your resources. The file that you wish to read using the Resource Manager needs to be a .properties file. This is just a standard text file with the name of your resource bundle suffixed with a .properties.

The structure of this file is the property and then the assigned value. Comments can be incorporated by implementing the hash symbol.


#this is the riality resource bundle
uploadURL = http://localhost/testApp/upload.cfm
companyID = 1212

Store this file in a local directory. For this test application I have mine structured like so. I have this example setup in my Flex 3 SDK directory. Notice that the I’ve used the “en_US” named folder, this is the default locale for the flex compiler, but allows us to add other locales if need be by simply adding creating another locale named folder and providing the same .properties files.

Now you’ll need to set your source patch for the resource bundle. To do this right click on your flex project. Click on the Flex Build Path from the left hand menu. Click the Source Path menu Button. Here you have the option to add a source path folder.

Click the Add Folder button and browse to your resource bundle directory and click ok. However where replace the “en_US” with the special characters {locale}. This is set by the flex compiler additional arguments. You can see this when you click on the Flex Compiler in the left hand menu.

After that you’re right as rain to start accessing your bundle in your Flex 3 Application.


[ResourceBundle("riality")]
private var companyID : String = ResourceManager.getInstance().getString("riality","companyID");

Bundles have never been easier to manage. You could say it makes it a real bundle of joy to manage.

Dispatching Events with Cairngorm 2.2.1

While trawling through the CairngormEvent.as I noticed the distpatch() method which in essence calls the same code that was needed in the previous versions of Cairngorm.

Pre Cairngorm 2.2 example

var userVO : UserVO = ModelLocator.getInstance().userVO;
var event : LoginChangeEvent = new LoginChangeEvent(LoginChangeEvent.LOGOUT_EVENT,userVO);

/* dispatch the event */
CairngormEventDispatcher.getInstance().dispatchEvent( event );

Latest example

var userVO : UserVO = ModelLocator.getInstance().userVO;
var event : LoginChangeEvent = new LoginChangeEvent(LoginChangeEvent.LOGOUT_EVENT,userVO);

/* dispatch the event */
event.dispatch();

It just saves having to import the CairngormEventDispatcher and typing those extra characters. Which can save a lot of time if you’re a chicken pecker typist 🙂

Psudo-Streaming with the flash player

Well today I was doing a bit of R & D into video Pseudo-Streaming. The term Pseudo meaning Fake or having an appearance of. Which is what it exactly is when applied to video streaming. In a roundabout way it allows the user to play the video anywhere on the timeline before the video has been fully downloaded.

I came across this great article here over on flash guru with a fully functional demo using a php backend. I’ve also seen an example using a Coldfusion service to handle the stream. Basically it’s a wrapper for some neat little java byte and filestream manipulation. Steve Savage’s post can be found here

This works a treat however we did stumble across and issue when trying to play a handful of converted .flv files. For some reason these files would not Pseudo-Stream. At first I thought it may have been a code issue but then had a look inside the .as code at the metadata listener.


ns['onMetaData'] = function (obj)
{
duration = (duration != undefined) ? duration : obj.duration;
times = obj.keyframes.times;
positions = obj.keyframes.filepositions;
};

the times variables was being set to null and using the FLV Meta Data viewer on the trouble makers I was able to confirm that these files did not have any keyframes.

Not exactly sure why these files didn’t contain any keyframes. I know that you can set keyframes from the CS3 Video conversion utility so it was possbible their conversion software that wasn’t creating the keyframes.